Most people have no idea what the installation process looks like before their first one. Here is the full sequence, from calling an electrician to using your charger for the first time, along with how to choose a good electrician, how the code shapes the job, and what the work actually costs.
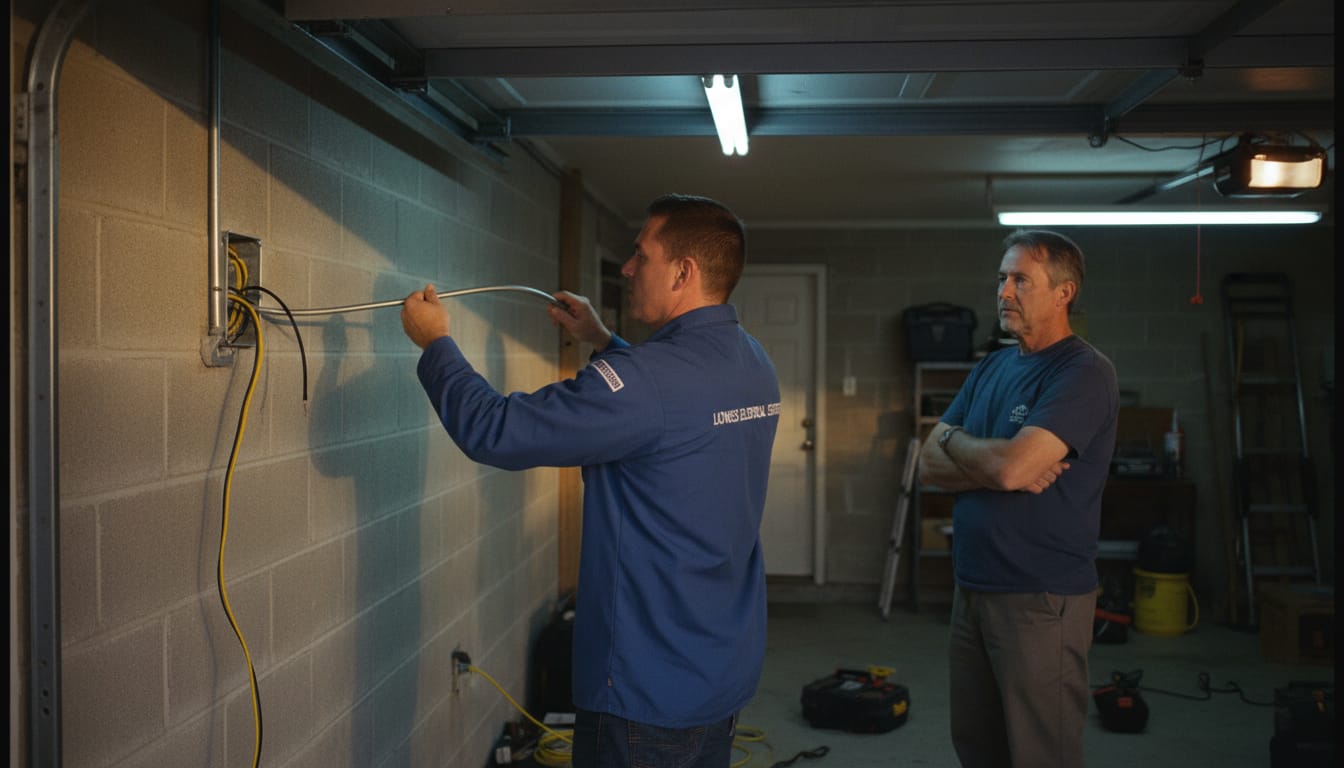
Step 1: Electrician assessment (30–60 minutes)
A qualified electrician visits your home and evaluates:
- Your electrical panel: capacity, available breaker slots, proximity to parking
- The proposed charger location: wall surface, mounting options, cable routing
- Any obstacles: finished walls, long wire runs, outdoor conduit requirements
- Panel upgrade need: if your panel lacks capacity, they'll say so upfront
This visit is typically free or low-cost as part of a quote. Don't skip it; remote quotes over the phone are less accurate and can lead to surprises.
Questions to ask during the assessment:
- Do I need a panel upgrade, or do I have available capacity?
- Is this installation permit-required in my city/county?
- What's the total cost including labor and materials (charger hardware excluded)?
- Will there be a visible conduit run, and where will it route?
- Are you familiar with local permit requirements, and will you handle the application?
- What amperage circuit would you recommend for my situation?
Get quotes from at least two electricians. Pricing varies significantly by region and contractor, and the first quote is rarely the best one.
Choosing the right electrician
The person you hire matters more than the charger you buy. A good installation on a mediocre charger beats a poor installation on a premium one.
What to look for:
- Licensed electrician (C-10 contractor in California; licensed electrical contractor in most other states); verify their license number with your state's contractor licensing board
- Experience specifically with EV charger installations (not just "electrical work")
- Familiarity with your local jurisdiction's permit process
- Willingness to pull a permit and be present for inspection
Red flags in contractor interactions:
- Suggesting you skip the permit ("it's just a simple outlet")
- Unable to give an itemized breakdown of labor vs. materials
- Quote delivered over the phone without a site visit
- No mention of the permit and inspection process
- Vague timeline with no specific availability
How to find candidates:
- Ask your EV's manufacturer for certified installer referrals (Tesla, Rivian, GM often have preferred lists)
- Get a referral from your utility company's EV program
- Check ChargePoint's installer directory or similar manufacturer-maintained lists
- Ask neighbors with EVs who they used
Step 2: Pulling the permit (3–15 business days)
In most US jurisdictions, EV charger installations require an electrical permit. This is normal and appropriate; it protects you. A permitted installation has been reviewed against local code, and the final inspection confirms safe work.
Your electrician typically handles permit applications. Some jurisdictions have online permit systems that process in a day or two; others require in-person applications that take longer.
Why you shouldn't skip the permit:
- Unpermitted electrical work can void your homeowner's insurance for fire damage related to the wiring
- It creates negotiation leverage problems when you sell your home
- Some utility rebate programs require a permit number as proof of compliant installation
- It's the difference between confirmed-safe work and unverified work
If your electrician suggests skipping the permit, find a different electrician.
Step 3: Installation day (2–4 hours)
The actual installation is fast once the permit is in hand. A typical sequence:

Hardwired or plug-in: a decision that changes the job
Before the install, you and your electrician choose between hardwiring the charger directly to the circuit or installing a 240V outlet (usually a NEMA 14-50) that a plug-in charger connects to. This is not just preference; the National Electrical Code (Article 625) treats the two differently, and that affects cost and code requirements.

For a permanent home charger, hardwiring is usually the cleaner choice. Plug-in makes sense if you value portability or want to use an existing dryer outlet through a smart splitter.
What installation actually costs
The cost range for home EV charger installation is wide because the variables are wide.
What drives cost up:
- Long wire run from panel to charger location (every 10 feet of additional run adds cost)
- Outdoor installation requiring weather-resistant conduit
- Finished walls that require fishing wire through drywall rather than running along a surface
- Panel at or near capacity requiring load management or sub-panel work
- Trenching for detached garage (conduit must go underground)
Typical scenario cost ranges (as of Q2 2026):

The federal 30C tax credit has ended. The 30C credit returned 30% of your total out-of-pocket cost (charger plus installation), capped at $1,000 on your federal taxes, but it ended for property placed in service after June 30, 2026 under the One Big Beautiful Bill Act (Public Law 119-21). It applied only if the home sat in an IRS eligible census tract, and "placed in service" meant operational and inspected, not contracted or paid for. Because the deadline has now passed, a project starting today cannot claim it; budget the full out-of-pocket cost. See our dedicated 30C article for the historical eligibility rules, and your state page on this site for the state-level rebates and utility programs that are now the incentives that remain.
Step 4: Inspection (1–10 business days after installation)
After installation, your electrician calls for an inspection from the local building department. An inspector visits, checks the work, and either approves or requests corrections.
Most EV charger installations pass on the first inspection. Common issues that cause failures:
- Missing or open junction box
- Conduit not properly secured to the wall at required intervals
- Incorrect wire gauge for the circuit amperage
- Missing or incorrect breaker label in the panel
- GFCI protection missing in locations where required by code
Your electrician should handle scheduling the inspection and be present for it. If corrections are needed, they fix them and reschedule. A good electrician makes this seamless; it shouldn't require you to do anything.
Total timeline

This timeline is why planning ahead matters. Ideally, start the electrician conversation before you finalize the vehicle purchase, not after delivery.
Post-installation checklist
Once installation is complete and the inspection has passed, confirm:
EV manufacturer installer programs
Several manufacturers maintain preferred installer networks that can simplify the process:
Tesla: Offers Powerwall-certified electricians through the Tesla app's "Find an Installer" flow. Pricing is fixed-fee through Tesla's program in some markets, which removes negotiation friction but may not be the lowest price.
Ford: The Ford Connected Charge Station comes with an installation program through Qmerit, a national installer network. You get a guaranteed licensed installer with experience on Ford installs.
GM (Chevy, Cadillac): Similar Qmerit partnership for Ultium vehicles. Pre-screened, licensed installer with GM-specific experience.
These programs don't prevent you from using a local electrician; they're an option when you want lower friction and don't have a trusted local contractor. The tradeoff: you may pay a slight premium versus competitive local bidding.
What good looks like
A properly installed Level 2 charger:
- Has a dedicated circuit with a correctly sized breaker (typically 60A for a 48A charger)
- Is mounted securely to wall studs or a backing plate at a comfortable cable reach height
- Has neat, code-compliant wiring, with no exposed wire outside of conduit or raceways
- Has a permitted, inspected installation on record with your local building department
- Works the first time you plug in your car without troubleshooting
If any of those aren't true, go back to your electrician. A properly done job doesn't require follow-up.
Last factually verified: 2026-05-24 against NEC Article 625 (EVSE installation, including 625.43 disconnect and 625.54 GFCI) as summarized by EC&M code-basics and electrical continuing-education references, 2026 Level 2 installation and permit cost surveys (Qmerit, EcoFlow, ElectrifyHome, The Garage Guide), and IRS Section 30C "placed in service" and eligible-census-tract guidance. Cost and timeline figures are typical ranges and vary by region, jurisdiction, and adopted code edition.